
There are plenty of techniques for working efficiently in Vectorworks software.
One of the most effective tactics is simply how you set up your files.
A well-structured file setup allows you to reuse the same starting point with every new project. The upside is that you’ll have classes, layers, title blocks, document settings, and more already in place, so you don’t have to go through the process again. Many firms have several standardized file setups or template files saved for different project types, such as residential projects, live events, or public works.
Here’s an overview of how to set up your design file and save it as a template file:
1. Start with a Default Template via File > New and selecting a template, and fine-tune it to suit your workflow, or begin with a completed project and remove anything you don’t need for future use. To streamline the file, use the Purge command in the Tools menu to eliminate unused objects and resources.
2. Set up your file with the desired elements. You want to include elements like Classes, Layers, Viewport Styles, Title Blocks, Worksheets, and more. You don’t want to include design layer geometry or project-specific resources.
3. Select the Save as Template command from the File menu.
4. Enter a name for the template and place it in the appropriate Templates folder. Templates are in .sta format.
5. Click Save.
6. To use the template, select one from the Home Screen. If the template is placed in the appropriate folder, you can access it via the Templates tab. Or, select File > New, then select Use Document Template.
7. Select your new template from the list.
Setting Up Your File: Document Settings
There are three important document settings to make sure you’ve addressed in your file setup:
- Units (template-level)
- Preferences (template-level)
- Georeferencing (project-specific)
Units and preferences are ideal candidates for your office templates, because you’ll want those to be consistent across projects. Georeferencing, on the other hand, is usually configured on a per‑project basis once you know the site and survey information.
Units
Via File > Document Settings, you can set the preferred units for the project, whether that be metric or imperial.
You can also set unit preferences for length, area, volume, and angles and select their desired precision for increased accuracy. Length also has a rounding style option, which can be set as fractional or decimal.
Preferences
Naturally, document preferences should be set for what works best for you. So, take some time to think about the different settings in the preferences dialog box.
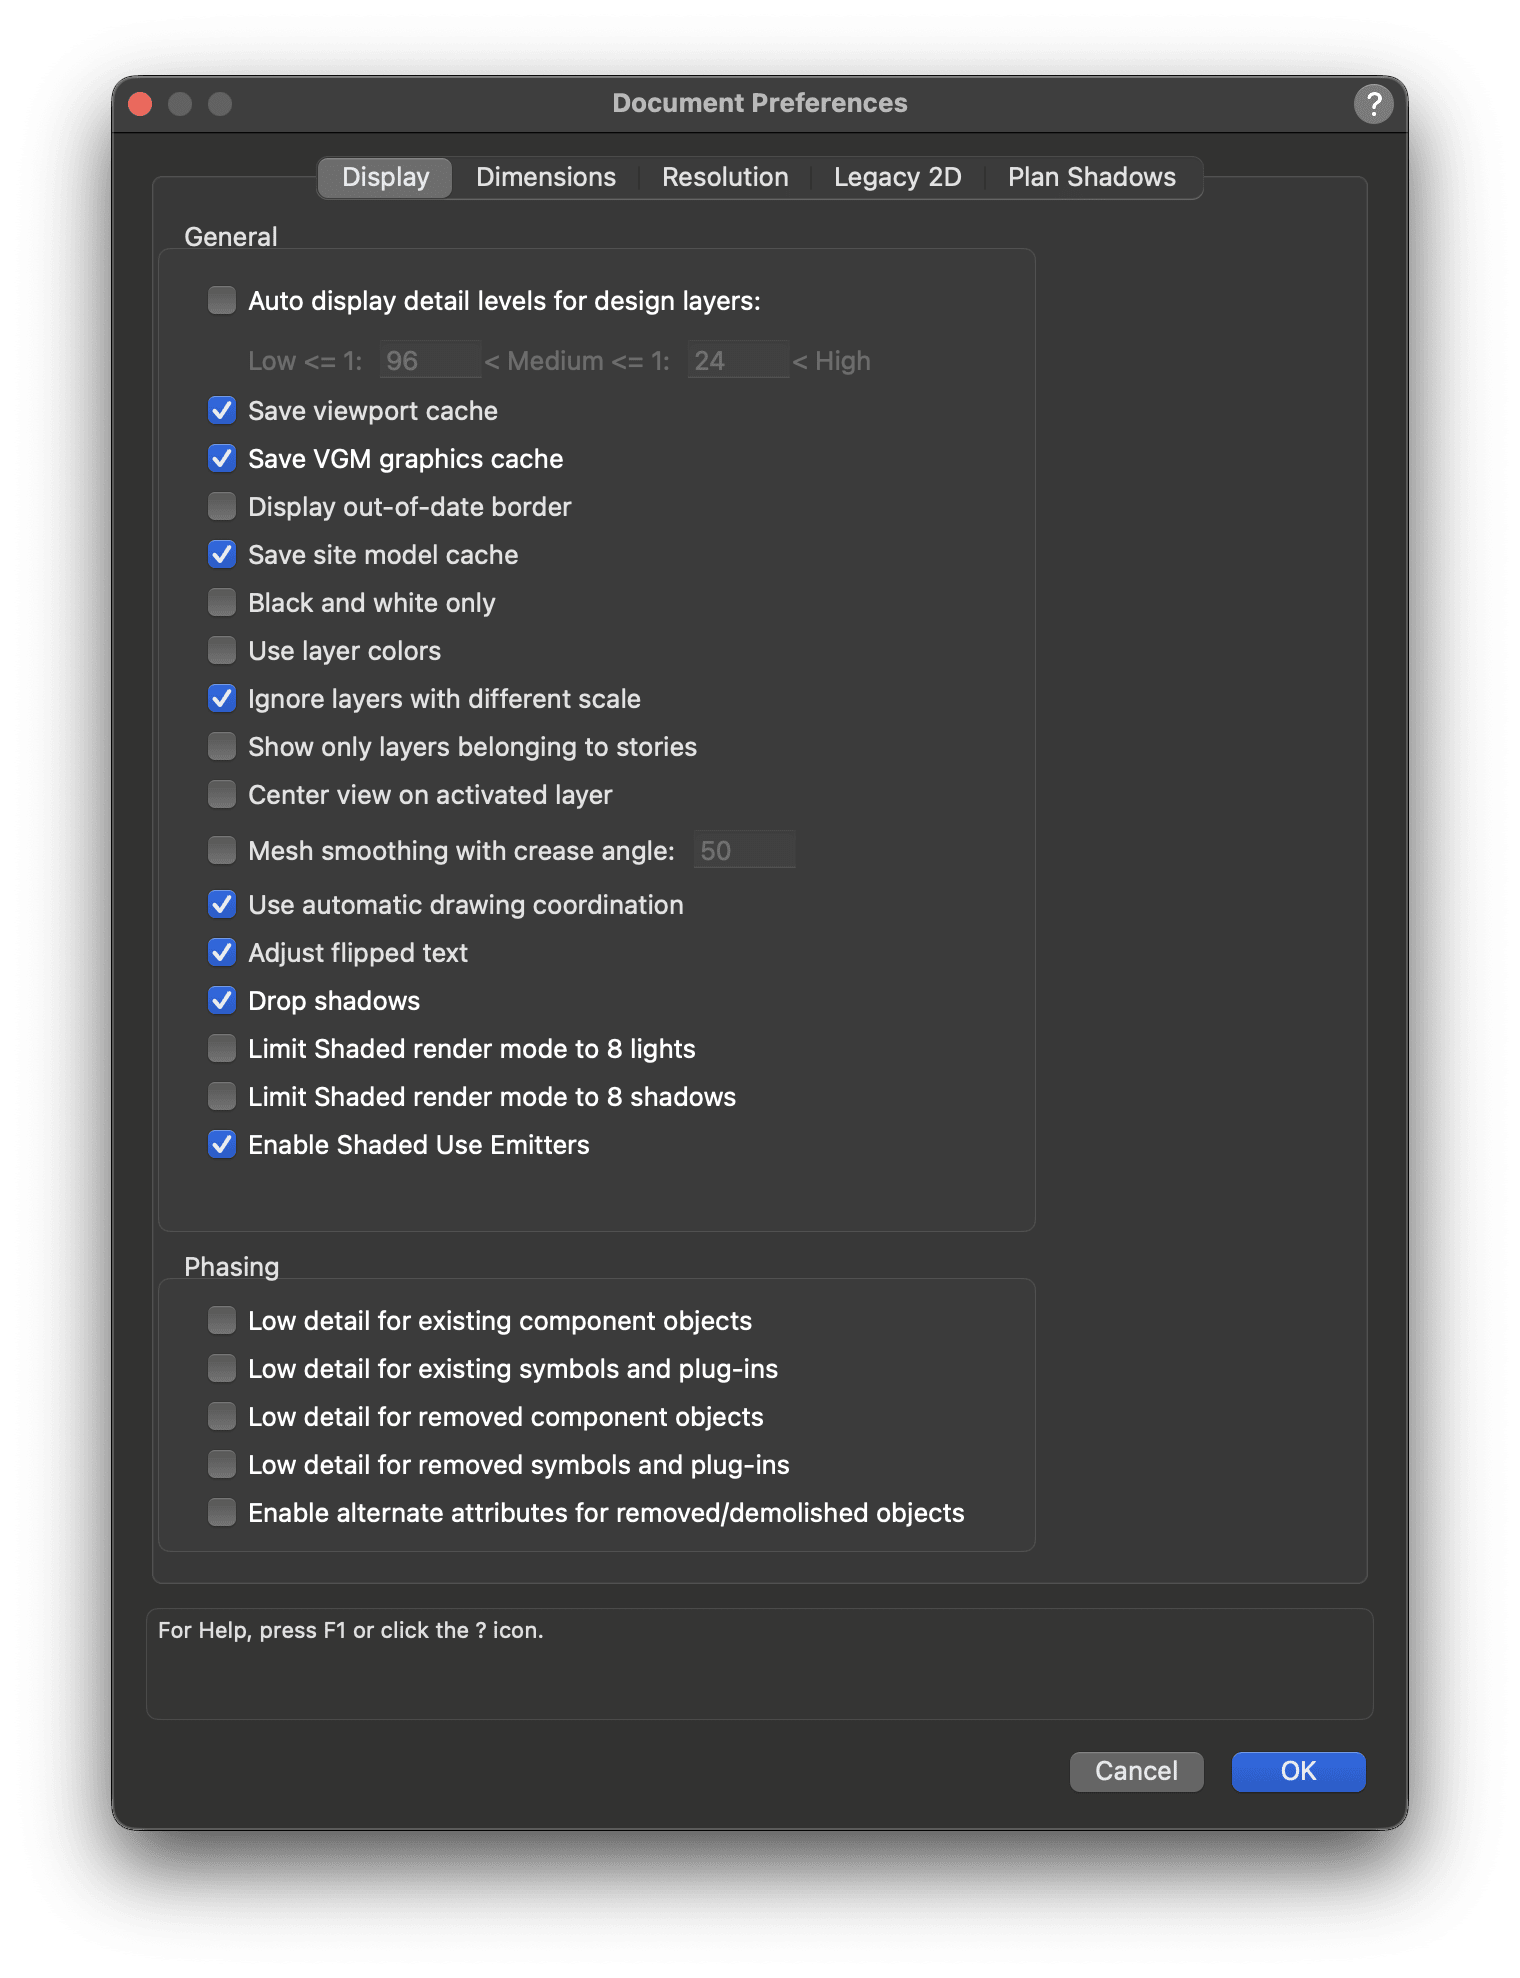
For instance, check Use Automatic Drawing Coordination to make sure that your drawing labels, markers, and title block borders coordinate with your sheet names and numbers.
When you’re working with design elements and massing models early in the project, shadows are a great way to convey height in a presentation plan view.
As part of your file setup, you can also define tool defaults for commonly used tools such as Walls, Doors, Plants, and Lighting Devices so they draw correctly as soon as you place them. To change these defaults, select the tool and then click the wrench and pencil icon in the Mode bar.
Georeferencing
Inaccurately mapping your drawing onto the Earth's surface may result in skewed imagery.
Georeferencing is the process of aligning your model’s Internal Origin and geometry with a precise location on Earth, typically using a Coordinate Reference System - CRS. By enabling and configuring georeferencing, each design layer synchronizes its coordinate system with a geographic coordinate system of latitudes and longitudes or eastings and northings.
In Document Settings > Georeferencing, you can choose a coordinate system and define the Internal Origin's location and rotation. You can also use the Survey Point to relate your Internal Origin to survey data, making it easier to coordinate with consultants and keep your Vectorworks file aligned with external references.
Because georeferencing depends on project‑specific information such as the site survey and project location, it’s usually something you configure after starting a new project, rather than something you hard‑code into a company‑wide template.
If you’re collaborating with civil engineers who use Civil 3D, upon importing the file into Vectorworks, Vectorworks can read and implement the CRS embedded in the DWG file.
Setting Up Your File: Design Layers, Classes, and Sheet Layers
Design Layers, Classes, and Sheet Layers are crucial for your file organization in Vectorworks. It’s important to set them up early in your file in such a way that they work best for you.
Ultimately, there’s no single correct way to set these things up — what ends up being correct is the setup that makes sense to your practice and allows you to work efficiently.
Still, there are some basic tips to follow to make sure your file structure is well organized. After these tips, it’s encouraged that you explore additional organization methods to find your sweet spot.
Tip: Design layers are the “where,” classes are the “what,” and sheet layers are for documentation and presentations.
Using Built-In Templates
You can benefit a ton from starting your file setup with one of the preformatted template files that come with Vectorworks. You can find these by selecting File > New, then using the Use Document Template dropdown menu.

Design Layers
In addition to the “where,” it can be helpful to think about Design Layers as sheets of trace paper, specific to design elements like finishes, rigging, or hardscape surfaces. You draw groupings of elements on each sheet of trace paper, then stack them.
Design Layers work the same way, except you can stack them preemptively and modify their visibilities as needed.
Exploring Design Options
Instead of duplicating objects and placing them side by side as you would in other programs, you can use design layers to toggle into the different design concepts you’re exploring. The example below shows two separate furniture options placed in different layers.

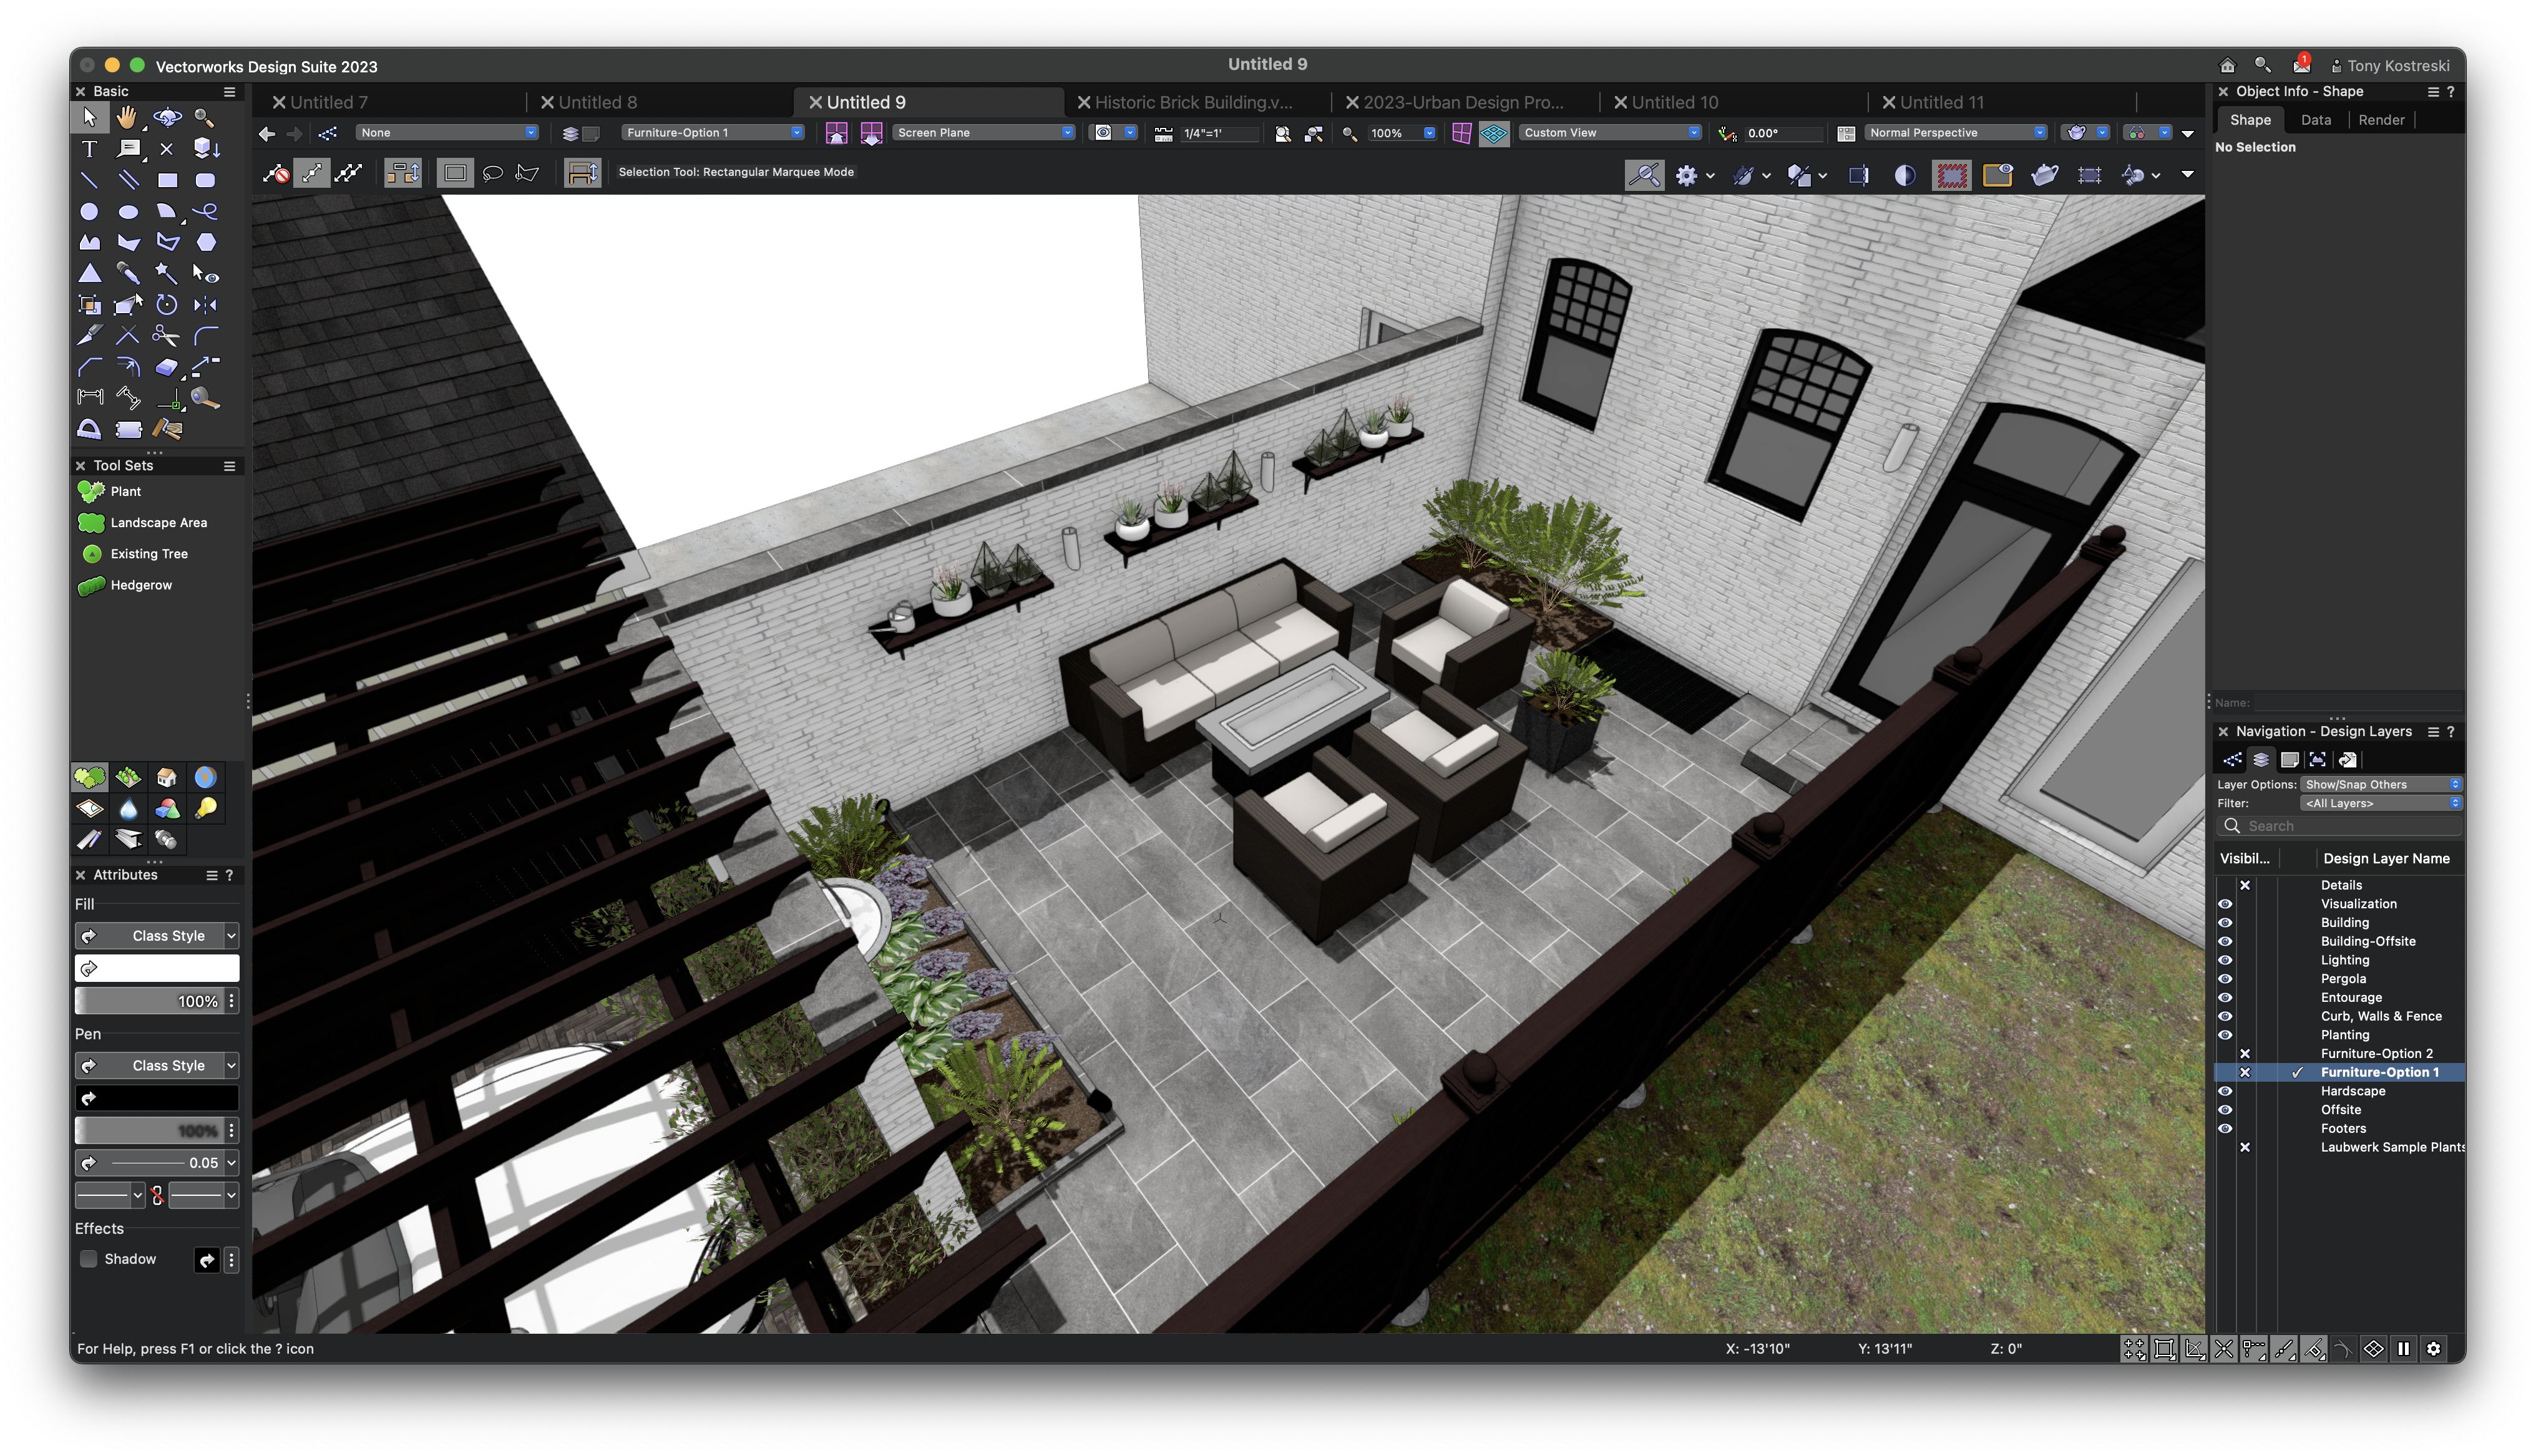
That’s a simple use of this method. It’s not hard to imagine how useful setting up Design Layers to explore design options like this can be, especially when working with clients.
Classes
Classes in Vectorworks are your methods for controlling graphical attributes, reporting, and general data management.
Regarding graphical control, think of activating a class like you’re choosing between which of your pencils and markers you’re going to use. Common graphics you’ll want to control with Classes are Fills, Pen Style, and Line Thickness.
For reporting and data management, it’s helpful to separate objects by their “what” — furniture, scenic elements, hardscapes, etc. — so you can easily pull categorized data into reports.
When you place an object from the Vectorworks default content, it will already be classed. Depending on the object, component parts may also have their own specific classes. Adding more objects to the file in this way places them in the same class.
Use these classes to control the visibility of different parts of your objects. If you wish to change the names of these classes for new objects placed in your drawing, you can use the Class and Layer Mapping command in the Tools menu.

Sheet Layers
At this point, it should be no surprise that setting up your Sheet Layers in addition to everything mentioned in this article will help save you time in the long run. Each Vectorworks template provides a basic list of sheets to get you started.

These sheets should cover a lot of what you’ll want to document or present. The easiest way to create new sheets is to simply duplicate and rename an existing sheet. The Title Block will automatically update to the new Sheet Title and Sheet Number.
DIVE DEEPER INTO VECTORWORKS SKILLS
Browse Vectorworks University for free webinars, industry insights, and more.
Stay in the know with the latest insights
Subscribers receive news, customer stories, success and learning tips, event information, and other important announcements from Vectorworks.
By submitting this form, you agree that Vectorworks, Inc. and its authorized partners may contact you in regards to news, offers, and the use of our software, services, and platforms. Learn more about our privacy practices and your data on our privacy page.*